Showing posts with label recipes. Show all posts

Friday, June 18, 2010

Homemade Frozen Fruit "Ice Cream"!

It's getting hot out! Where I live in Indiana, we have been in the upper 80's and low 90's this week, so I know that means that other areas of the country are even hotter! I came across this idea, or "recipe" on Eat From Your Pantry, and thought that it sounded too good to be true - using frozen fruit to make ice cream.  How great is that?  And such a delicious and healthy treat for these hot summer afternoons!

The basic idea is to take a frozen banana and puree it in your food processor until it becomes creamy, kind of like ice cream.  I wasn't really sure it would work, but the first time I tried it, low and behold, I had a smooth, creamy, ice cream like treat that my kids couldn't get enough of.  And the only ingredient - One frozen banana!

I decided to branch out a bit, I tried adding some mixed frozen fruit, strawberries, raspberries, blackberries and blueberries, with the banana.  The result was not quite as creamy, more sorbet-like, but still really, really good.  I served it to my family when they were in town visiting and everyone couldn't believe that all it had in it was frozen fruit!

So, last week, I decided to try it the way Anjanette from Eat From Your Pantry did, with bananas and strawberries. It was so great I think it's going to be my main way of making this awesome summertime treat from now on.

Homemade Strawberry Banana Ice Cream in the food processor

The ingredients:
1-2 Frozen Bananas (cut into chunks)
Handful of frozen strawberries (cut into smaller chunks if they are whole)
splash of whole milk
(Obviously use more or less depending on how many people you are trying to serve - this was a great amount for me and my two small kids.)

 Cut your strawberries into small chunks, they didn't process so well like this!

Put banana(s) and strawberries in your food processor and blend together.  You have to let it process for a while.  It will seem at first like it's not going to get creamy, but when you get to that point, add a splash of milk, and keep going. 
When it looks like this, keep going! 

This is the end result that you are looking for, nice and creamy, just like ice cream! But without any added sweetener!

This stuff is seriously so good, you will want to make it every single day.  And you will feel great feeding it to your kids because only you know that it's made with just whole fruit, and is so good for them! It's a great way to use frozen bananas - put your bananas into the freezer whole, when they are a little on the over-ripe side, they are great to use in banana bread, smoothies, or like this!

Also, check out this post and some of the comments, there are tons more ideas for how to make "ice cream" this way.  I may have to try some of the other combinations soon, like peanut butter, chocolate and banana - Yum! 

Okay, my kids are waking up from their naps and now I really want to make this for them!

----------------------------------------------------------------------------------------------------
Thanks for visiting Live Renewed! If this is your first time here and you'd like to learn more about me and what Live Renewed is about, click here. If you like what you've read, and would like to read more, you can subscribe to my blog by clicking here! You can also follow me on Twitter.

Are you new to being frugally green? Be sure to check out my Frugally Green Fundamentals.

Thursday, June 3, 2010

Crockpot Southwestern Beans

Finally! Here is the recipe that I was telling you about for Southwestern Beans in the crock pot.  I love using the crock pot in the summer! Usually you think of crock pots for winter meals like soups and stews, and while it's probably true that most crock pot meals are a little on the heavier side, I love that I don't have to turn on my oven; that I can throw everything in in the morning and then spend the time before dinner outside, instead of in a hot kitchen; and that I can even plug in the crock pot outside to cook so it doesn't heat up the house at all! 

This recipe came from my wonderful sister, (who's getting married later this month, I might add!) and we both had our own ways of adapting it to fit our tastes - or really we didn't follow the directions of the recipe and it still turned out good! :)

This is a great meatless meal, good flavor and still really filling, and especially if you used dried beans, it is so super frugal.  This will probably become a regular for our Meatless Mondays.  

Southwestern Bean Medley in the Crock Pot

14 ounces vegetable broth - (I used homemade chicken stock)
1 Tbsp chili powder
1 tsp ground cumin
1 can black beans (rinsed and drained) - (I used the equivalent of cooked dried beans)
1 can chickpeas (rinsed and drained)
1 can white kidney beans (cannellini) - (I used the equivalent of uncooked, dried Great Northern Beans, because white kidney beans are a little bit more expensive.)
1/2 C dried lentils
1 C diced tomatoes with green chilies
Copped fresh cilantro leaves

Mix all ingredients except tomatoes and cilantro in 3 1/2 quart slow cooker (or whatever size you happen to have). Cover and cook on low 6 to 7 hours.  Add tomatoes.  Cover and cook for 1 hour.  Sprinkle with cilantro.

Now for my my sister and I's personal notes:
She put the tomatoes in at the beginning and they were fine.  I didn't put the tomatoes in at the beginning, and then forgot to put them in at all! Still tasted fine, but we think it would have been even better with the tomatoes.  Next time I'll just put them in at the beginning, just so I don't forget.

The recipe suggests serving over rice, which we both did, and really enjoyed it that way.  My sister told me that it turned out more soupy than she expected, so the last hour or so, she left the lid vented to cook off some of the liquid.  I lifted the lid for maybe the last 30 minutes, and we didn't think it was too soupy, but I did use some dried beans that weren't cooked yet, so that might have soaked up some of the liquid.

If you are going to use uncooked dried beans for this recipe, you need to make sure that you soak them ahead of time.  I just soaked mine overnight and then put them in the crock pot with the rest of the ingredients the next morning.  I also added some extra chicken broth to make sure the beans were cooked through.

My sister and I both added extra seasoning toward the end of the cooking time to increase the flavor - you could add salt, pepper, white pepper, garlic powder, onion powder, cayenne pepper and/or cumin to suit your tastes.  My sister also added some chopped jalapenos, and though my hubby would have loved them, I'm not a jalapeno person, so that didn't happen at our house.  So, just taste it as your nearing the end of the cooking time and add spices accordingly.

Sorry I don't have any good pictures to go along with this post - this is why I am *not* a food blogger! :) 

Enjoy!

----------------------------------------------------------------------------------------------------
Thanks for visiting Live Renewed! If this is your first time here and you'd like to learn more about me and what Live Renewed is about, click here. If you like what you've read, and would like to read more, you can subscribe to my blog by clicking here! You can also follow me on Twitter.

This month's Change Challenge is - Frugally Green Baby Care. You can catch up on all the Change Challenge posts here.

Are you brand new to being frugally green? Be sure to check out my Frugally Green Fundamentals.

This post is linked to:
Frugal Fridays at Life as Mom
Recipe Swap at Grocery Cart Challenge
Food on Fridays at Anne Kroeker

Friday, May 28, 2010

How to Make Homemade Yogurt

Photo by hollygon21

My kids and I eat homemade yogurt on almost a daily basis, and I am still here to tell you about it!
Homemade yogurt might seem overwhelming, or a little scary - you are culturing bacteria after all, but it really couldn't be easier.  Plus it's good for your wallet, it will definitely save you money, especially over buying the individual fruit flavored cups, and good for the earth because it saves on the processing and packaging of conventional yogurt.

I made my first batch of homemade yogurt just about a year ago, and I think I can count on one hand the number of times that I have bought yogurt since then.  Over the past year of making yogurt, I have come up with a few tips and tricks that help me to make the the best yogurt (in my humble opinion).

I'm sorry that I don't have any of my own pictures.  I don't usually think about taking pictures when I'm making, or eating for that matter, my homemade yogurt.

Easy Homemade Yogurt in the Crockpot

*Plug in a crockpot and turn on low.  It's very important to do this first so you don't forget, and so the crockpot is the right temperature when you're ready to pour the milk in - can you tell I know this from experience?  

*Heat milk in a saucepan over medium heat, stirring occasionally until it reaches 190 degrees. (I use a candy thermometer I got at Meijer for $10). You can use whatever amount of milk you want - I usually do either 4 cups or 8 cups. You want to be careful not to let the milk burn on the bottom of the pan, and make sure it doesn't boil over - so stir often and keep an eye on it.

Also, I have stopped checking the temperature during this step.  It's just one less thing to have to do.  When the milk starts getting bubbly and frothy (or it boils over onto your stovetop) you know it's done.

*Once milk reaches 190 (bubbling) remove from burner and run a sink half full of cold water.  Cover the pan and place into water in sink.  (This is kind of obvious, but make sure the water doesn't go over the top of the pan, just part way up the sides.) You can add ice to the water as well, but I've found that it doesn't really cool the milk down any faster, and that's again one less thing to do.  Can you tell I'm all about simplifying steps here?!

*Let milk cool down, stirring occasionally.  Once milk has reached between 90 and 110 degrees (I've read different temps here, I usually do about 100 degrees), remove pan from water. 

*Put yogurt starter into a bowl (I use glass) and pour about a cup of the warm milk over it and stir together. Use 2 Tbsp of yogurt starter per 4 cups of milk. Meanwhile pour remaining milk into heated crockpot.  Pour milk and yogurt from bowl into the crockpot and stir it all together. 

*Put the lid on, turn off and unplug the crockpot and wrap a heavy towel around it.  Let sit for 6-10 hours. (I usually do around 8 hours).

*Place crockpot bowl in fridge to cool yogurt - this step is really important because it helps the yogurt to set better.  Since I started doing this my yogurt has been nice and thick and creamy.  If you don't have room for your crockpot in your fridge, you can carefully ladle yogurt into containers and cool in the fridge.  Don't stir too much, it needs to be disrupted as little as possible in order to set well. 

*Set aside about a 1/2 cup of yogurt to be used as yogurt starter for your next batch. 

A few more tips:
Your yogurt starter should be plain yogurt that specifically says "Live and Active Cultures" on the package.  I use Dannon, and have had success with both the regular (full fat) yogurt and the fat-free plain yogurt (that is all they sell in the small cups at my grocery store).

I use whole milk to make yogurt because we have switched to using all full fat dairy products.  But, I know that my sister uses 2% milk with good results, although she says it's not as thick as when you use whole milk.

If you are having trouble with your milk burning on the bottom of the pan, turn your heat down.  It might take longer for the milk to heat up, but you should have less trouble with it burning.

It definitely depends on the price of your milk, but last year, I figured out that it cost me $1 to make 64 oz (8 cups) of yogurt, more than a $3 savings off Dannon plain yogurt on sale, and even greater savings compared to buying the individual fruit cups.

Our favorite ways to eat homemade yogurt are with a little raw honey and frozen fruit, usually blueberries, or topped with homemade granola.  Here is a great way to make your own fruit yogurt to-go cups, instead of buying the individual ones: just mix the frozen fruit and honey into the yogurt in a container with a lid, and the fruit will help to keep it cold but will have thawed out by the time you are ready to eat it.  Yum!

Have you considered making your own yogurt at home?  Do you have any questions about it?  


----------------------------------------------------------------------------------------------------
Thanks for visiting Live Renewed! If this is your first time here and you'd like to learn more about me and what Live Renewed is about, click here. If you like what you've read, and would like to read more, you can subscribe to my blog by clicking here! You can also follow me on Twitter.

May's Change Challenge is Decreasing Your Household Waste. You can catch up on all the Change Challenge posts here.

Are you brand new to being frugally green? Be sure to check out my Frugally Green Fundamentals.


This post is linked to:
Frugal Fridays at Life as Mom
Recipe Swap at Grocery Cart Challenge
Food on Fridays at Ann Kroeker

Friday, January 29, 2010

Baking Day Bonanza!

So, I started my first attempt at baking/freezer cooking days yesterday.  Things went pretty well.  Not as great as I had planned, but I was trying not to set my expectations too high since this was my first time attempting something like this.

The one picture I managed to take yesterday - yummy pumpkin muffins!
A few thoughts from the day:
  • It is WAY easier to have one child then two, why did I ever think that having one child was so hard?  Grammie came and picked up Kaelyn for the day yesterday, so I just had Bren and it made things much easier for me.  We even went to the grocery store in the middle of the snow with bad roads, something I would NEVER do with two kids in tow! 
  • Going to the grocery store in the middle of your baking day will cause you to not get as much stuff done. Duh! I really wanted to make meatballs and on my shopping trip last week realized that it was too early to get ground beef to use this week without freezing it in between, and I didn't get to the store earlier this week, so I chose to go yesterday when I only had to bring one child.  But, that obviously affected how much cooking I could get done. 
  • Babies NEVER take naps when you want/need them too.  Yesterday B slept for a total of 1 1/2 hours during the day. 45 min. in the morning and 45 min. in the afternoon, not really enough time to get anything significant done.  He actually woke up from his afternoon nap just as I was plunging my hands into the meatball mixture.  I had to let him cry for a few minutes because my hands were all gross. 
  • Most of the recipes I planned to make, I have never made before.  This makes things a little harder too, because there is always a learning curve with new recipes.  So, some things took me a little extra time because I didn't exactly know what I was doing.  That's all part of the process though - learning new things! 
Here's what I accomplished yesterday: 
-make meatballs (made 48 meatballs and a small meatloaf)
-make chicken nuggets (cut out breasts from the whole chicken, cut up and ready to go)
-bake pumpkin muffins (made a double batch and froze 25 muffins)
-make tortillas (dough is in the fridge, ready to be made today)
-cook whole chicken and make chicken stock (made 11 cups of stock and got 3 cups of shredded chicken meat for chimis)
-make chimichangas (waiting on making the tortillas)
-bake crispy cheese crackers (These are pretty good, but kind of a lot of work - especially if you don't know what you're doing)
-roast butternut squash (need to puree and freeze for baby food)
-bake apple squares
So, today I need to bake apple squares, roll out and fry up tortillas, make chimis, and make chicken nuggets.  Really not too bad.

The worst part of all this is that I basically did nothing else around my house yesterday, and the kitchen is still pretty messy.  I did clean up some last night, but I was pretty tired and there were A LOT of dishes, so I didn't get them all done.  Somehow I have the feeling that I'm not going to get them all done today either - we'll see. And meanwhile the laundry is piling up, the kitchen table is covered with stuff, The house is just kind of in disarray. :(  So, that's not fun to know that I have that to take care of on top of the rest of the cooking.  At least it's Friday, and I know I have lots of yummy food to show for my hard work!

Also, I tweeted a bit yesterday throughout the day as I cooked and baked.  Yes, I am on twitter now. :)  You can follow along with me (@liverenewed), and others bloggers who are baking and cooking over the weekend with the hash tag #oamc.  You can also follow along at Life as Mom and Money Saving Mom for their February Freezer Cooking Days.

Thursday, January 28, 2010

Mexican Chicken Pasta Skillet

I was already planning to make this meal and post the recipe this week, and then Katie announced that she was hosting a skillet recipe "The Meals that Hamburger Helper was Trying to Imitate" carnival and I knew that this fit in perfectly. I really like that this recipe has a Mexican twist on what is traditionally an Italian type meal.  

Mexican Chicken Pasta Skillet
2 cups penne or rotini pasta (we use whole wheat)
1 lb. chicken breasts, cut into bite size chunks (I just use one large breast and it is enough)
1-2 Tbsp. butter or olive oil
1 1/2 - 2 cups salsa
1 cup frozen corn
1/2 c chopped green pepper
1/2 c chopped colored peppers (optional)
1 can kidney or black beans (or use 1 2/3 cups cooked dried beans)
onion salt, garlic powder and paprika to taste (about 1/8 tsp. each) 
1 cup shredded cheddar cheese

Cook pasta according to directions on package.

While pasta is cooking, melt 1-2 Tbsp. butter or olive oil in a skillet. Add chicken and cook and stir for 2 minutes, until outside of chicken is mostly cooked.  Add the rest of the ingredients, except for cheese, and bring to a boil.  Reduce heat and cover, simmering for 10 minutes or until chicken is cooked through, stirring occasionally.


Drain pasta, return to pan and add chicken mixture.  Stir to combine and top with 1/2 cup of the cheese. Cover and allow cheese to melt.  Stir and serve topped with remainder of cheese sprinkled on top.


A few notes:
  • Obviously, this is not quite a one dish meal.  If you had a super large skillet you could probably add the pasta and some extra water to the skillet and cook it that way too.
  • I sometimes add colored peppers and sometimes not, depending what I have on hand, this time I used some red pepper I had in the freezer along with the green pepper.
  • Use cooked dried beans, it's MUCH cheaper!! 
  • A little pre-prep work makes this a snap to throw together at dinner time, just pull everything out of the freezer to thaw - chicken cut into bite-sized chunks, diced pepper, cooked dried beans, corn - and you're ready to go!  
  • You could also use real onion and garlic instead of powder.  We don't handle much onion in our house, but as I was writing this I thought, Why didn't I put fresh garlic in there instead of powder? 
  • My hubby said, "This is really good."  I have a great husband, but he is not a big encourager in the cooking/food department.  He usually just eats what's in front of him without a lot of comment, good or bad.  So, the fact that he made a positive comment about this means something, at least to me. :)
  • As this is a pretty complete meal-in-one, I'm having a hard time figuring out what to serve with it.  It looks so lonely on the plate all by itself.  Any ideas for me? 

And Baking Day.  I told you on Monday that I was planning baking/food prep days for today and tomorrow.  Well, I did a lot of baking and cooking today, it didn't go exactly as planned, but that's okay.  I accomplished about half the things on my list, but also had to make a grocery run in the middle of the day.  So, I'm pretty happy with myself and plan to finish stuff up tomorrow, although it may be a little tougher with a certain 2 year old around.  I'm planning to post more about my kitchen adventures tomorrow, so be sure to check back!

Please visit Kitchen Stewardship for more One Skillet Recipes that are husband-approved.
And Recipe Swap at Grocery Cart Challenge

Friday, January 22, 2010

Easy Black Bean Hummus

I've been making this hummus for a while and it's so easy and yummy too.  And it doesn't require tahini, which lots of other recipes do and is fairly expensive to buy.  One more thing to make at home and not have to buy store-bought!

Black Bean Hummus
1 can black beans, drained (or the equivalent in cooked dried beans, about 1 2/3 cup)
1 can garbanzo beans or chickpeas (or the equivalent in cooked dried beans)
2 Tbsp. olive oil
1/4 c. lemon juice
1/4 c. plain yogurt (I use my homemade yogurt)
2 cloves of garlic, roughly chopped
3 tsp. cumin
salt and pepper to taste
water as needed

Add the ingredients to a blender or food processor and puree until smooth, adding water as needed to achieve desired consistency. I usually don't add any water, but a tablespoon or two should be enough.    I prefer my blender because I think it's smoother that way, but you have to add the beans slowly to the blender, otherwise it will be to thick.

I think this tastes best after it's been refrigerated for a while and the flavors can blend together.  So I usually make it the night before and refrigerate overnight.  So yummy with pita bread, crackers, carrots or other veggies, or spread on sandwiches. 

This makes a lot!  But, it can be frozen and still has a good consistency and flavor.  So I've been making a batch and freezing half to use later.   You could cut it in half, but then what do you do with half a can of beans?  If you used cooked dried beans, you could cut it in half more easily because you can control the amount of beans you're using.

Great healthy snack idea for upcoming Super Bowl parties!!

Recipe Swap at Grocery Cart Challenge
Ultimate Recipe Swap at Life as Mom

Friday, January 8, 2010

Using Up Leftovers - Egg Fried Rice

I found this recipe in my Southern Living Cookbook and we have made it a lot over the last few months, I've tweaked it and adjusted it to just use what we have on hand. I meant to take a picture when I made it last Sunday after church, but we were all starving and it just got eaten right up!

It is a great way to use up those pesky leftovers you have sitting in your fridge like veggies and meat.  I mean really, who wants to eat those things reheated?  Veggies just get mushy and meat gets dry and tough.  But throw them into fried rice and you have yourself a quick, easy and even nutritious meal! Especially when you use healthier fats, brown rice, and free-range eggs like we do at our house.

The trick to fried rice is to used cooked rice that's been chilled.  This helps it to keep it's texture during cooking.  This recipe is also great because the measurements don't have to be exact - just throw it together and it still tastes great every time! 
 
Here's the recipe as it appears in The Southern Living Cookbook:
1/4 c. chopped green onions or shallots
1 c. frozen English peas
2 Tbsp. vegetable oil
3 c. cooked long-grain rice
1 egg lightly beaten
3 Tbsp. soy sauce

And here's how I do it:
 - Heat some coconut oil or a mixture of butter and olive oil in a frying pan. I use at least 2 Tbsp or more, depending on how many veggies I'm going to be adding.
 - Add frozen peas and whatever other leftover (or frozen) veggies I have in the fridge.  I've even put in some fresh veggies, like diced carrots, sometimes. We don't do onions at our house, so I just leave those out.
 - Saute for a few minutes until veggies are cooked/heated through.

- Add rice - I usually don't have anywhere near 3 cups.  I just use whatever leftover rice I have in the fridge, or I have sometimes made a pot of rice and put it in the fridge the day before in anticipation of making fried rice.  
 - Also, at this point I add any leftover cooked meat that we might have.  Sometimes we eat it with meat and sometimes without. I have added everything from diced chicken, to leftover pork roast, even a leftover turkey burger with cheese on it.  It was good every time!
 - Heat rice and meat thoroughly.

 - Make a well in the center of the pan by pushing the rice mixture to the sides.  Pour the egg into the well and cook. I usually use two eggs for extra protein, especially if I'm not adding any meat, and Jer likes lots of egg in his fried rice. The directions say to cook the egg until set, stirring occasionally, but I find that the egg doesn't cook that quickly and when I try to stir it, it all gets mixed up anyway.  So I usually let the egg cook until slightly set on the edges and then just stir everything up and keep cooking until the eggs are done.
 - Add soy sauce and stir everything together.  Use light soy sauce or it will be very salty.  And I don't measure, I just pour it around a little until it looks like a good amount. 

Enjoy! 

Do you have any standby recipes that you turn to when you need to use up leftovers?  Please share!


Ultimate Recipe Swap at Life as Mom
Recipe Swap at Grocery Cart Challenge


Friday, September 25, 2009

Homemade Laundry Detergent

Since I've been on such a homemade kick recently, it would make sense that I would try making my own laundry detergent. I wanted something cheap, gentle on our clothing, and safe for our family.
Did you know that most commercial laundry detergents are filled with enzymes, brighteners, softeners, fragrances and dyes (basically yucky chemicals) that coat your clothing making them appear cleaner by appealing to your sense of sight and smell? The colors look bright and the clothes smell good, so they must be clean, right? I don't know about you, but I don't want to be wearing all those chemicals against my skin all day, so here's what I've been using for homemade laundry soap. My friend Jenica gave me the recipe, and after doing a little more reading online I decided on the type of soap I wanted to use.

Update #2 - 2/26/10 - I was still having some major trouble with this laundry detergent leaving spots on our clothes, so I made the switch to using Fels Naptha, along with using the tips from the update below, and have had great results for the last month or so! 


Update #1 - 11/18/09: I was having some trouble with spotting on some of my clothing with this detergent. (Grrr) I made a batch without the baking soda and I also used the food processor to grind the soap into small beads (cut the soap bar into strips first). I also read that the detergent doesn't dissolve as well in cold water, so I've been starting my loads with warm water and then after two minutes or so, once the soap has been dispensed into the washer drum and has some time to dissolve, I switch the water to cold. These changes seem to have eliminated the problems I was having!


Homemade Laundry Detergent

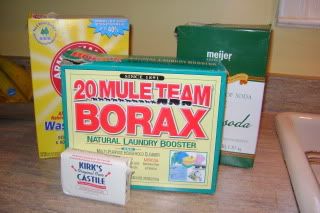
3 cups of Borax, and
2 cups each:
Washing Soda
Baking Soda
Grated Soap - I use 1 bar of Kirk's Castille Soap  now I use 1 bar of Fels Naptha.  

I have a front loading HE machine and use about 2 Tbsp. per load. This is a naturally low-sudsing detergent, which is what is important for HE machines. The amount of detergent you use is something that you may have to experiment with and find out what works best for your washing machine.

I use white vinegar in place of fabric softener. I fill the fabric softener compartment in my machine with white vinegar. It does a good job of naturally softening the clothes and helping to keep them free of static.

You could also double the recipe to make more at one time. We've been using it for a few weeks and I'm happy with the results. Our clothes smell nice and fresh and just simply clean - no harsh chemicals or synthetic fragrances. I still pre-treat any clothes that have stains with Spray 'n Wash (love that stuff, but don't love the ingredients), but I am working on figuring out a greener, natural stain remover for when my bottle runs out.

Also, I found another similar recipe online, just without the baking soda. I may try that next, just to see how it works, one less ingredient means that it is just that much cheaper to make!

Do you use natural or homemade laundry detergent? What works for you? Also, if you have a natural, homemade stain remover I would love to hear about it!

Check out Grocery Chart Challenge for more great recipes, and Life as Mom for more frugal tips.

Wednesday, September 16, 2009

Homemade Macaroni and Cheese

Last week for lunch I made Kaelyn and myself some Homemade Macaroni and Cheese. I was desperate for something to eat for lunch, having not been to the grocery in almost 2 weeks. I kind of just made it up, but also know that it's something so simple and basic as far as cooking goes that it's probably the way that macaroni and cheese used to be made before the boxed neon fake cheese stuff took over.

homemade macaroni and cheeseIt was really good, much better than the box, creamy and rich, and Kaelyn ate it up! It wasn't quite as easy as the boxed kind, but I think the more I make it, the easier it will get for me. I also think it shows how with all of the convenience, boxed foods available, that we have gotten away from the fine art of basic cooking. I want to work on learning these basic cooking skills as much as I can to continue eliminating convenience foods from our diet.


So here's my Homemade Macaroni and Cheese. The recipe for the sauce is from my Southern Living Cookbook and is just a basic white sauce with cheese added.

Use about a cup and a half to 2 cups of elbow macaroni, boil according to package directions.

While pasta is boiling, make cheese sauce:

2 Tbsp. butter
2 Tbsp. flour
1 cup milk
salt and white pepper
1 cup shredded cheese (I used cheddar and monterey jack)
1/4 tsp. dry mustard

Melt butter in saucepan over low heat. Add flour and stir until smooth. Cook for 1 minute, stirring constantly. Slowly add milk while continuing to stir constantly and cook until thick and bubbling. Add salt, pepper, cheese and dry mustard and stir until cheese is melted.

Pour cheese sauce over cooked macaroni and serve. Yum!

I also think this would be a great place to sneak some hidden veggies in! Some pureed sweet potatoes, squash or pumpkin could be a great thing to add to the sauce when you stir in the cheese.

No more neon orange macaroni and cheese for us!

Check out Works for me Wednesday for more great tips!

Tuesday, September 8, 2009

Meal Plan Monday

Photobucket

I'm a little off this week because of the holiday weekend! We had a great time just hanging out with the family. It's so nice to get a break like that every once and a while.

Last week I made Lentil Tacos for Meatless Monday. I thought they were really good. They tasted almost like regular meat tacos. Jer thought they were just okay, he thought I was trying to trick him - he thought we were having regular tacos until I put out the lentils on the table instead of taco meat. :) Oops, I guess I need to warn him next time.

Here's this week's menu:

Breakfast:
Oatmeal with fruit
Rice Krispies
Waffles and fruit
Green Smoothies

Lunch:
PB & J
Leftovers
Grilled Cheese
Tuna salad sandwiches

Dinner:

Monday - dinner at church

Tuesday - dinner with our small group - making Soft Garlic Breadsticks

Wednesday - Crockpot Cream Cheese Chicken (left over from last week)

Thursday - pasta with marinara sauce, salad, garlic bread in the bread machine (not sure about desert yet!) This will be our meatless meal for the week since we had dinner at church on Monday.

Friday - Hamburger Curry

Saturday - Jer's Birthday!! We are going to a friend's birthday party who shares his birthday with Jer!

Sunday - Maybe dinner with Jer's fam to celebrate his birthday? Not sure what we're doing yet...


Check out more great meal plans at Organizing Junkie!

Monday, August 31, 2009

Meal Plan Monday

Photobucket

Another week, another meal plan! Last week the Homemade "Hamburger Helper" was pretty good. I did add some cheese to it, and Jer said that it was way better than the box kind! Which is a success in my book. K thought it was macaroni and cheese. :) It also made pretty good leftovers for lunch.

Also, the Crockpot Pork Chops we made yesterday turned out really well. I didn't care for the potatoes, but Jer thought they were okay. If I were to make it again (which I probably will) I will just make the pork chops in the crockpot and make mashed potatoes on the side.

Also, I decided that Meatless Monday is much more appealing when I make things to go with our main dish. Having the quesadillas, plus corn bread and cookies for desert this week made for a much better meal. So, I'm going to try to plan side dishes and deserts for Meatless Monday from now on. The only hard part about it is often the type of meatless main dish that we eat is usually served as a side dish to meat, so it's hard to come up with some other kind of side dish to serve. I'm thinking I'll often be making bread in the bread machine, because homemade bread is always yummy!

Here's this week's menu:

Breakfast:
Oatmeal with fruit
Rice Krispies
Waffles and fruit
Green Smoothies

Lunch:
Ham and Cheese Sandwiches
PB & J (the J being homemade apricot Jam - Yum!)
Egg Salad Sandwiches
Chicken Ranch Wraps
Leftovers

Dinner:

Meatless Monday - Lentil Tacos, cornbread, brownies

Tuesday - Grilled Chicken topped salsa and cheese

Wednesday - Chili

Thursday - Dinner with our small group, I'm making yummy Chocolate Cake!

Friday - Thai Lettuce Wraps

Saturday - Hamburgers or Brats on the grill

Sunday - Crockpot Cream Cheese Chicken


Check out more great meal plans at Organizing Junkie!

Thursday, August 27, 2009

Homemade Fruit Snack Bars

As I said in my meal plan post this week, I am on a quest to find frugal homemade alternatives to convenience food items. And, one of the results of my garbage inventory was that I want to try to reduce our waste from food packaging.

Snack bars, like granola bars or Nutrigrain bars, are so convenient to pack as snacks or to take for lunches. But, they are full of high fructose corn syrup, enriched (white) flour, white sugar, and lots of other things that really aren't good for you. Also, because they are individually wrapped, they create a lot of packaging waste, and are pricey for an individual serving.

My wonderful hubby saw an article in the paper with a recipe for homemade fruit snack bars, and cut it out for me, and I was so excited to make these. We used fresh peaches that we picked ourselves, and frozen store bought raspberries. I'm really bad at calculating the cost of making things from scratch (I need my math genius sister's help with that!), but I'm pretty sure that these would be cheaper per serving than a Nutrigrain bar.

Oatmeal, Raspberry and Peach Snack Bars
1/3 cup orange juice
2 Tbsp. cornstarch
2 Tbsp., plus 1/2 cup packed light brown sugar, divided
1 1/2 cups frozen or fresh raspberries
1 1/2 cups frozen or fresh peaches
1 1/2 cups quick rolled oats
3/4 cup all purpose flour
1/2 cup butter, softened
1 tsp. baking soda
1 large egg, lightly beaten

In a medium saucepan whisk together the orange juice, cornstarch, and 2 Tbsps. of the brown sugar. Add the raspberries and peaches and stir over medium high heat until the mixture is simmering and thickened, about 5 minutes. Remove from heat and set aside to cool.
Preheat oven to 350. Add the oats, flour, remaining 1/2 cup of brown sugar, butter and baking soda to a large mixing bowl and mix together with a fork until the dough is crumbly but beginning to stick together. Set aside 1 cup of the mixture.

Mix the egg into the remaining dough. Transfer the dough with the egg to a greased 8x8 or 9x9 baking dish and press it evenly over the bottom.

Spread the fruit filling on top, then sprinkle the reserved crumb mixture over it.
Bake for 30 to 35 minutes, or until lightly browned and bubbling. Place dish on a wire rack to cool completely. Cut into 16 bars.

These did turned out pretty well. The fruit filling is really good. The bars were a little dry on the bottom and not as firm on the top as I thought they would be. They need to be refrigerated if not eaten right away (learned that the hard way!). All in all, I think they were a good alternative to nutrigrain type bars. They are really not anything like a granola bar, so I'll still have to work on finding a recipe for homemade granola bars. I will definitely be making them again - maybe cooking for a little less time to keep them from getting to dry on the bottom. Also, I'm thinking it would be fun to try them with different fruit combinations - maybe blueberry/raspberry or strawberry/blueberry. Yum!

Do you have any good recipes for homemade snack bars or granola bars? Please leave a comment with a link or your recipe!

Visit Grocery Chart Challenge for more great recipes and Life as Mom for more great frugal tips!


Wednesday, August 5, 2009

Going Green - Smoothie Style

Image source

We have been making fruit smoothies for breakfast for a while now. I go in phases of making them a lot and then not making them for a few weeks or even months. I am determined now, though, to make them at least 3 times a week for breakfast. They are such a great way to get lots of healthy stuff into your diet, just by drinking a glassful.

Lately, I have come across the idea of green smoothies - as in putting green things (leafy green veggies!) into your smoothies to give it even more nutritional value. Since we (specifically Jer and Kaelyn) are not big green vegetables eaters, I thought this would be a great way to sneak some good stuff into our diet. So, I tried it out, by putting spinach into our smoothies, and I have to say it was a great success! I had told Jer I was planning to make some green smoothies and he was, of course, skeptical of the idea. The first day I made it, I gave him his glass, and he asked, "Is this a green one?" I said, "You tell me." He took a drink and honestly couldn't tell the difference. I was thrilled! I had actually convinced him to eat (well, drink) something that was really good for him! And Kaelyn drank a big glassful too, which is awesome because she refuses to eat almost any kind of vegetable. We are converts - we will be making green smoothies in our household from now on!

Here's how I make them. I don't really measure ingredients, I just put them in the blender in amounts that look good to me and then taste it and adjust it if needed.

Green Smoothie: (all measurements are very approximate)
  • a cup of Milk or Soy Milk (we have been using vanilla soy milk)
  • 2 large handfuls of spinach
  • a cup of plain (or vanilla) yogurt (we use my homemade yogurt)
  • 1/2 cup frozen blueberries
  • 1/2 cup frozen raspberries
  • 1 -2 tablespoons ground flax seed (a great source of fiber and omega-3 fatty acids which most of us don't get nearly enough of in our diets!
  • 1 banana
Put the spinach in the blender and pour the milk over it. Blend on high until relatively smooth. Then add the rest of the ingredients and blend until you have a nice smoothie. Taste and adjust with more fruit, honey or even a little vanilla if it needs to be sweeter. Enjoy! And be impressed that you just got between 4-6 servings of fruit and veggies taken care of for the day!

On the left is the blended spinach and milk. Doesn't look to appealing, huh?
And to the right is the finished product. You can't even tell there is anything green in there. It looks like a regular fruit smoothie! You can sneak the greens in there if you want and your hubby and kids will never know! :)

Have you ever tried green smoothies? What's your favorite green smoothie recipe?

Monday, August 3, 2009

Meal Plan Monday

Photobucket
This week my sister-in-law and nieces are in town visiting from Oregon, so we'll want to spend as much time as possible with them. I'm planning meals so we will have something to eat if we are home, but we might not stick to the plan to closely this week.

We're still trying to use up stuff from our pantry and freezer - just trying to keep our grocery bill as low as possible right now.

The BBQ Chicken Pizza from last week was a big hit! We had friends over for dinner and everyone enjoyed it. I followed a recipe from This Week for Dinner (you have to scroll down the page to see it). Super easy and very yummy!!

Okay onto this weeks menu:

Meatless Monday - Monterey Spaghetti

Tuesday - Chicken and Noodles

Wednesday - Sloppy Joes (from last week)

Thursday - Egg Salad Sandwiches or Eggs and toast

Friday - Broiled Tilapia Parmesan

Saturday - leftovers or freezer meal

Sunday - freezer meal

Check out more great meal plans at The Happy Housewife this week!

Tuesday, June 9, 2009

Homemade Multipurpose Cleaner

Yesterday I finally made a homemade green cleaner, other than just vinegar and water. I got the recipe from the book Homemade. I made this as an attempt to have a multipurpose cleaner that Jer can use because he *hates* the smell of vinegar and refuses to use the vinegar and water cleaner. I used apple cider vinegar in attempt to make it as "un-vinegary" as possible.

Fresh Smelling Multipurpose Cleaner

3 1/2 cups hot water
1/2 cup white or apple cider vinegar
1 teaspoon Borax
1 teaspoon washing soda
1 teaspoon liquid castile soap
1 32 oz. spray bottle

Fill spray bottle with hot water first, then add vinegar, borax, washing soda and castile soap. Shake well to mix ingredients and then shake well before using each time.

I'm not sure it is really "fresh smelling", although it doesn't smell like vinegar at all. In fact, it got Jer's approval!! I sprayed it all around on the kitchen countertops and stovetop last night and had Jer come in and smell it. He said it smelled like a science experiment (not sure exactly what that means), but he agreed that he didn't smell any vinegar, and agreed that he would be willing to use it as a cleaner. My counters were not that dirty, so I can't really attest to how much cleaning power this has, but I am excited to have a cheap, homemade, green cleaner that doesn't smell like vinegar and that my hubby will actually use!

The directions in the book say to spray on countertops, kitchen appliances and fixtures, and tile or painted surfaces. I'm sure you could use it in the bathroom too.

I'd love to hear if you have recipes for homemade cleaners that you use.
Happy "frugally green" cleaning!

For more thrifty ideas visit Tightwad Tuesdays at BeingFrugal.net!

Sunday, June 7, 2009

Meal Plan Monday

We're counting down to the arrival of Baby Boy McClements! Just two short weeks 'til my due date! I want to make sure we have food in the fridge and meals planned so we don't go hungry when we come home from the hospital.

Also, Jer was not so excited about Meatless Monday last week (it wasn't a shared decision, I just kind of threw it at him). :) Sooo, I'm going to have to be creative with my meatless dishes to try to keep him happy. This week he will be at the Young Life golf outing on Monday, so it will just be K and I for dinner.

Meatless Monday - Eggs-either scrambled or cheese omelet, and toast

Tuesday - Homemade Pizza (carry over from last week)

Wednesday - Dinner at a friend's house

Thursday - Crockpot Sour Cream Salsa Chicken

Friday - Grilled Tilapia

Saturday - Leftovers or TBD

Sunday - Sloppy Joes

Also, I'm going to start to try planning breakfast and lunches for the week. Too often, I go to the grocery store and come home and seem to have nothing to really eat! I want to start packing lunch for Jer to take to work - which is much healthier, cheaper, and greener than eating out! So, I need to plan to have things to make and for him to take to eat. I'll post more about that on next weeks meal plan, as I'm just getting started with it.

For more great meal plans visit Organizing Junkie!

Friday, June 5, 2009

Friday's Frugal Cooking - Yogurt in the Crockpot!!

Yes! I did it, I made yogurt in my crockpot yesterday! I am pretty excited about it - and all the possibilities!

I followed this recipe to a "T", (I LOVE the crockpot lady!) and it turned out perfectly, and it was SOOOO easy! I used Meijer whole milk, and Dannon plain yogurt for the starter. I figured out that it cost me around $1.00 (including the energy for the crockpot) to make 64 oz. of yogurt. I can buy the Dannon on sale for $2 for 32 oz., which would be $4 for 64 oz., so making it myself saved me $3 (more if it wasn't on sale)!! Plus, when I started figuring out the cost of the individual fruit flavored yogurt cups the savings were even better!!

I plan to make fruit flavored yogurt by cutting up fresh fruit, or using frozen fruit, and mixing it into the yogurt when I am ready to eat it, or feed it to K. I'll probably add a little honey as sweetener too. I would also love to try making yogurt pops for the summer time - I just need to get some of those popsicle molds.

This is a perfect frugally green recipe because it saves you money and also saves on manufacturing, packaging, transportation, etc. costs of buying your yogurt at the store,
especially if you were buying the individual cups of yogurt before. It's also much better for you because you know all of the ingredients and how much (or little) sugar, sweetener, and other preservatives it has (or doesn't have) in it. Making things yourself from scratch is a great way to save money, lessen your impact on the environment, and eat more healthily (is that a word?) I hope to make more and more of my own "from scratch" foods like this. I would love to say that I will never buy yogurt again - but I think the likely hood is that sometime I will want yogurt and not have any homemade ready. My hope is though that I will buy much less yogurt than I was before!!

Go try making your own yogurt, it is easy, fun and frugally green!

Tuesday, February 24, 2009

Frugal Cooking

In an effort to trim down our expenses (even more than we already have), lately I have really been trying to figure out ways to save money on food and groceries. Besides meal planning, which helps alot, I have been following a few blogs that focus on cooking and eating frugally to get inspiration.

$5 Dinners - the title says it all, great recipes and ideas for $5 dinners.
The Grocery Chart Challenge - this lady is amazing! She feeds her family of 6 on only $60/week!
Fun Foods on a Budget - some basic recipes and some interesting/different ones - all in keeping with eating frugally.

I have a few recipes that I would like to make that include beans, and I have been waiting for a sale to stock up on canned beans, but haven't come across any lately. So, yesterday I was thinking about the bags of dried beans I have in my pantry from when we were getting WIC after Jer was laid off. They were free, and they have just been sitting there, and I really could put them to good use. I looked around online a little bit about cooking dried beans and found this post at A Year of CrockPotting (which is the BEST crockpot blog ever, by the way) and tried it out last night.

I put black beans in the crockpot to soak at about 4:30 yesterday afternoon, and then turned them on low to cook at 11:30 before we went to bed. They were pretty much done when I got up at 7:30, but I let them cook for another 1/2 hour. Then I drained them and let them sit out for a little while to cool down and put them into bags to freeze, a jar to use later this week in a recipe and then the leftovers in a baggie for snacks, etc. K actually ate a handful of them for her morning snack, and really liked them. And, I feel really good about her eating beans, they are so good for you and I know that the ones I made aren't loaded with sodium like the canned ones are.

It really was easy, I loved cooking them in the crockpot and just being able to turn them on and go to bed and they were ready to go in the morning. The thing that took the most time was sorting out the bad/broken beans before soaking them. I probably lost about 1/8-1/4 of a cup in bad/broken beans.

I have to price it out the next time I'm at the store, as I'm not quite sure how much this actual bag of beans cost, because it was free with WIC, but I think they are around $1 for 16 oz., and could be even cheaper on sale. I basically got the equivalent of 3 cans of beans, with a few leftovers. I think cans of beans are around $.75 or so depending on the type of bean and whether they are on sale or not, which makes these beans MUCH cheaper, even with the cost of energy, as the Year of Crockpotting post states. And again, like I said, it was easy. I'm pretty sure I'm going to be making beans like this from now on, unless I come across a crazy, amazing sale on canned beans.

Monday, February 9, 2009

Meal Plan Monday

I've seen this type of post on other blogs and although I haven't really looked into the original blog that does Meal Plan Monday, I thought I would try this out for myself. In the past I have tried planning meals for 4 weeks at once but it always seemed like something always came up and the meals never happened like I planned. So for me, it's definitely easier to plan meals on a weekly basis, but I don't always get around to doing it at the beginning of the week and then I get stuck at dinner-time not knowing what to make or eat for dinner. My goal is to actually plan my weekly meals on Sunday and make a grocery list so I can go shopping on Monday for the week, but since this is my first week doing this, I'm not that on top of it yet. :) I plan to post my meals here on Monday just to keep myself accountable.

So, here are my meals for the week:

Monday - Spaghetti Pizza - this is a recipe that I got from Jer's mom when we got married. I have never made it and I actually don't think I've ever had it at their house, but I have everything I need to make it and it seems pretty easy, so I'm going to try it out and see how it goes. I'll let you know!

Tuesday - Chicken Enchiladas - great recipe from my friend Shelley that Jer and I love! Great for leftovers too!

Wednesday - BBQ Pork in the Crockpot

Thursday - Stuffed Shells - I plan to make these ahead of time and put them in the fridge until ready to bake.

Friday - Broiled Tilapia Parmesan

Saturday - TBD - maybe leftovers or something simple or from the freezer.

Sunday - Crockpot Cream Cheese Chicken - I like to make stuff in the crockpot on Sunday so that it is pretty much ready when we get home from church and are starving! :)

Okay, so there you have it, my meals for the week. Hopefully everything goes as planned. I'll have to let you know. If you want to join me in planning and posting meals for the week, I'd love to hear from you!
Blog Widget by LinkWithin